This wiki is archived from 2021-09-05
Importing an existing unit
Importing an existing unit
Requirements
You will need Autodesk 3ds Max 2016 and Blender. Autodesk 3ds Max is available as a 30-day trial or a 3-year student licence (See here). Blender is available for free here.
On first start-up of Autodesk 3ds Max, choose classic mode. Then go to "Customize" and then "Units Setup...". In the Units Setup window, choose Metric and meters. Next click the button "System Unit Setup" and change inches to meters. Also uncheck "Respect System Units in Files". Click "Ok", and then "Ok" again. (If you don’t do this you might end up with wildly wrong scaled models ingame, PA uses meters.)
Blender is required to convert the .papa files that PA uses into .fbx files that can be used by Autodesk 3ds Max. A plug-in is needed for Blender to be able to read the .papa file. You can download it from here.
Converting .papa to .fbx with Blender
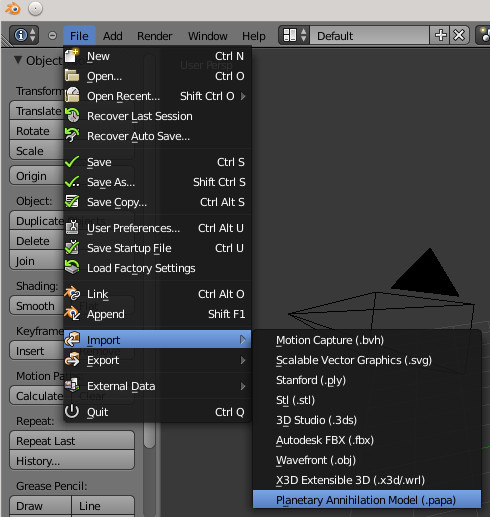
Right click on the cube in the centre to select it. Press <Delete> on the keyboard to remove it. Then go to "File", "Import", and then "Planetary Annihilation Model (.papa)".
The .papa files for the models are located in the subdirectories of "<PA Install Dir>/media/pa/units". Choose the .papa file that is just the name of the unit and no _blend, _diffuse, or anything else. For example, the model of the Boom Bot can be found at "<PA Install Dir>/media/pa/units/land/bot_bomb/bot_bomb.papa". The unit should now be visible in the 3D view.
Next, click on "File", "Export", and now choose "Autodesk FBX (.fbx)" and export the model to a new file.
Importing .fbx made by Blender into 3ds Max
Importing the file
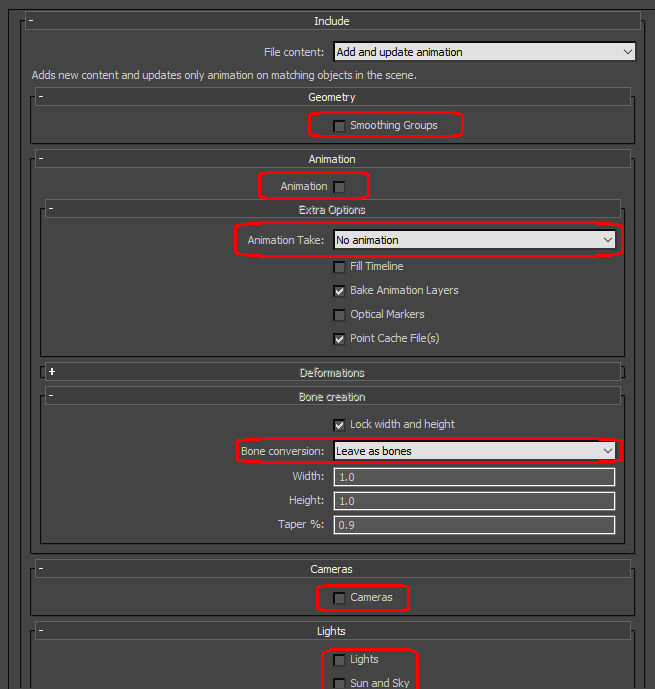
To import a file click the Max button in the top left and choose "Import" and open the .fbx file you created earlier. You will be presented with options for the import process.
Use the following settings:
| Include | |||
|---|---|---|---|
| + | Geometry | ||
| Smoothing Groups | Uncheck | ||
| + | Animation | ||
| Animation | Uncheck | ||
| + | Extra Options | ||
| Animation Take | "No animation" | ||
| + | Bone Creation | ||
| Bone Conversion | "Leave as bones" or "Convert as dummy"* | ||
| + | Cameras | ||
| Cameras | Uncheck | ||
| + | Lights | ||
| Lights | Uncheck | ||
| Sun and Sky | Uncheck | ||
| Global Ambient Factor | Uncheck | ||
| Advanced Options | |||
| + | Units | ||
| Automatic | Uncheck | ||
| File units converted to: | "Meters" | ||
*If your imported model has bones you want to preserve, choose "Leave as bones", otherwise choose "Convert as dummy".
Click "Ok" to import the file into 3ds Max.
Fixing the bone structure
This section is only required if you chose the "Leave as bones" option.
Source
Word document is here.

