|
|
| Line 14: |
Line 14: |
| Next, click on "File", "Export", and now choose "Autodesk FBX (.fbx)" and export the model to a new file. | | Next, click on "File", "Export", and now choose "Autodesk FBX (.fbx)" and export the model to a new file. |
| == [[File:gold-rank-icon.png|50px]] Importing .fbx made by Blender into 3ds Max == | | == [[File:gold-rank-icon.png|50px]] Importing .fbx made by Blender into 3ds Max == |
| To import a file click the Max button in the top left and choose import. | | To import a file click the Max button in the top left and choose "Import" and open the .fbx file you created earlier. You will be presented with options for the import process. |
| | [[File:3dsmax import settings.jpg|frame|center|The import dialog for .fbx files. Some of the required options are highlighted in red.]] |
| | Use the following settings: |
| | {| class="wikitable" |
| | !colspan="4" style="text-align:left;"|Include |
| | |- |
| | | |
| | !colspan="3" style="text-align:left;"|Geometry |
| | |- |
| | | |
| | | |
| | | Smoothing Groups |
| | | Uncheck |
| | |} |
|
| |
|
| '''Done until here. Rest is copy-paste from Word document'''
| | == Source == |
| | | Word document is [https://drive.google.com/folderview?id=0B_RXrYUHtKK_bjlieXhxbkZLajA&usp=sharing here]. |
| After choosing the file you get a bunch of options for how to import.
| |
| | |
| Under Geometry uncheck Smoothing Groups.
| |
| | |
| Under Animation uncheck Animation.
| |
| | |
| Under Extra Options choose No Animation.
| |
| | |
| Under Bone Creation you can choose to leave as bones or convert as dummy, when you have function
| |
| | |
| bones in the blender model you can leave them as bones to have them useable in 3ds Max.
| |
| | |
| The bones will however will be so small you can’t see them, and you will have to subtract 90 degrees of
| |
| | |
| rotation on the X axis of every bone because Blender adds 90 degrees when importing a papa file.
| |
| | |
| Imported bones will look very different visually from bones created in 3ds Max but they function the
| |
| | |
| same way.
| |
| | |
| If you convert as dummy the bones are not usable in 3ds Max and I have not found a use for this.
| |
| | |
| The width and height don’t seem to apply what ever value you set, same for tapers.
| |
| | |
| Uncheck cameras.
| |
| | |
| Uncheck all 3 options under lights.
| |
| | |
| Under Units uncheck Automatic and set File units converted to: Meters, if you don’t your scale will be
| |
| | |
| messed up.
| |
| | |
| You can click OK now, these settings will are remembered by the program.
| |
| | |
| Cleanup after import.
| |
| | |
| If you imported a .fbx from Blender that had bones you will have to delete some stuff.
| |
| | |
| In the left panel is a list of all the objects in the current file, select all (ctrl+a) and click the “unlink
| |
| | |
| selection” button.
| |
| | |
| This removes the parent structure of the bones, we have to recreate that later but it has to be removed
| |
| | |
| first.
| |
| | |
| Unlinked bones can be moved and rotated without affecting other bones.
| |
| Page 2 of 4
| |
| | |
| Delete Armature, delete every bone whose name ends with “_end”, delete the ones named diffuse,
| |
| | |
| delete the bones named like the unit, delete the bones named solid something.
| |
| | |
| The mesh will be called “mesh”, you might want to rename that to the name of your unit.
| |
| | |
| Rotate bones
| |
| | |
| Every bone Blender imports from a .papa file gets rotated +90 X rotation, we need to undo this.
| |
| | |
| Select the first bone in the left view, rightclick the rotate tool.
| |
| | |
| This opens a Rotate Transform box, under Absolute: world there are X Y and Z rotations.
| |
| | |
| Substract 90 from the value in X, so if it says 90 make it 0, if it says 0 make it -90.
| |
| | |
| If it says -180 make it -270, that will automatically turn into 90 but this is the desired rotation.
| |
| | |
| When you change the X rotation the numbers under Y and Z might change on their own, this is ok.
| |
| | |
| The numbers might also say -0,0 instead of 0,0 which is weird but that is technically the same value, it’s
| |
| | |
| fine.
| |
| | |
| Do this for every bone, do not rotate the mesh.
| |
| | |
| Select the mesh, rightclick in the viewport and select “convert to” and choose “convert to editable
| |
| | |
| mesh”.
| |
| | |
| After you do this is a good time to save your file in the .max file format so we have a clean place to start
| |
| | |
| with, if you mess up later this is a good start point.
| |
| | |
| Rigging
| |
| | |
| At the top of the right panel click the modify button.
| |
| Page 3 of 4
| |
| | |
| This is the Modifier list, it shows the modifiers applied to the thing which is selected, now selected is the
| |
| | |
| mesh which is named unit_name_here.
| |
| | |
| The mesh has the Editable Mesh modifier because we converted to Editable Mesh earlier.
| |
| | |
| The bones can also have modifiers, but should only have the modifier “bone” by default.
| |
| | |
| With the mesh selected click Modifier List and choose Skin, the Skin modifier will show up above Editable
| |
| | |
| Mesh.
| |
| | |
| Skin is needed for bones to link to parts of the mesh.
| |
| | |
| ================== | |
| | |
| It's weird that you have those bone rotataions, if you import dox model into blender, you should have
| |
| | |
| different. Note thought, that blender bones will also have wrong rotations, in 3ds max select them all, in
| |
| | |
| hierarchy tab (third tab on the right panel) select "Affect pivot only" and rotate them by -90 on X axis,
| |
| | |
| then make sure root_bone has (0,0,0) rotation.
| |
| Page 4 of 4
| |
| | |
| After exporting the texture but before exporting the model we have to remove the color from it again.
| |
| | |
| Maybe you could export the model before coloring, not sure.
| |
| | |
| If you didn’t, and exported the model with materials you will see ingame it has colors without texture
| |
| | |
| files being present yet.
| |
| | |
| If you see that your model is colored during the construction, you can fix it by removing materials before
| |
| | |
| exporting in 3ds max.
| |
| | |
| Go to utilities tab (hammer icon), click "More...", choose "UVW Remove", in parameter tab that
| |
| | |
| appeared click Materials (while mesh is selected).
| |
| | |
| Another thing that you have some unwanted stiches. You will have to manually fix uvs, you can do this by
| |
| | |
| selecting the Unwrap UVW modifier and clicking “open UV Editor”.
| |
| | |
| In the UVW editor choose mapping and then flatten mapping, the polygons that together form one flat
| |
| | |
| surface should be touching, if you notice some aren’t you will have to select them and stitch them.
| |
| | |
| Alpha layer is responsible for build frame. Right click -> Blending Options, select Inner Glow in the list on
| |
| | |
| the left, change Size.
| |
| | |
| What flatten mapping does, it automatically arranges polygons on uv map. "Flatten" is just one of the
| |
| | |
| methods of projection 3d object onto a plane. You do once because polygons are all messed up and
| |
| | |
| flatten mapping works best for a model like this (I don't actually know when would normal or unfold
| |
| | |
| mapping be used). Moving polygons around not going to make them any less "flat", but even deforming
| |
| | |
| polygons is not anything bad as long it helps to make better texture.
| |
| 4 of 4
| |
| STEP_1_Modeling.docx
| |
| Displaying STEP_1_Modeling.docx.
| |
You will need Autodesk 3ds Max 2016 and Blender. Autodesk 3ds Max is available as a 30-day trial or a 3-year student licence (See here). Blender is available for free here.
On first start-up of Autodesk 3ds Max, choose classic mode. Then go to "Customize" and then "Units Setup...". In the Units Setup window, choose Metric and meters. Next click the button "System Unit Setup" and change inches to meters. Also uncheck "Respect System Units in Files". Click "Ok", and then "Ok" again. (If you don’t do this you might end up with wildly wrong scaled models ingame, PA uses meters.)
Blender is required to convert the .papa files that PA uses into .fbx files that can be used by Autodesk 3ds Max. A plug-in is needed for Blender to be able to read the .papa file. You can download it from here.
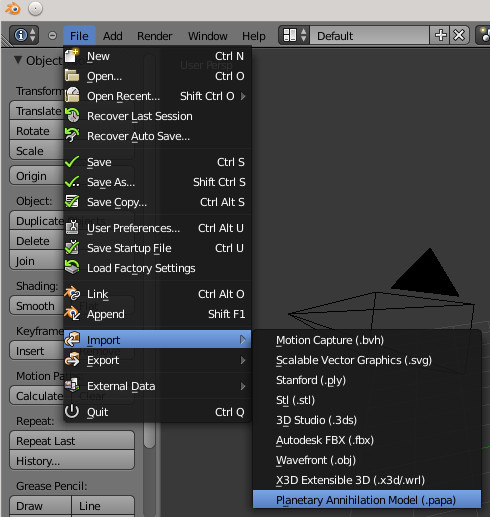
Right click on the cube in the centre to select it. Press <Delete> on the keyboard to remove it. Then go to "File", "Import", and then "Planetary Annihilation Model (.papa)".
The menu option for import .papa files. If this option is not present, make sure you installed the required plug-in correctly.
The .papa files for the models are located in the subdirectories of "<PA Install Dir>/media/pa/units". Choose the .papa file that is just the name of the unit and no _blend, _diffuse, or anything else. For example, the model of the Boom Bot can be found at "<PA Install Dir>/media/pa/units/land/bot_bomb/bot_bomb.papa". The unit should now be visible in the 3D view.
Next, click on "File", "Export", and now choose "Autodesk FBX (.fbx)" and export the model to a new file.
To import a file click the Max button in the top left and choose "Import" and open the .fbx file you created earlier. You will be presented with options for the import process.
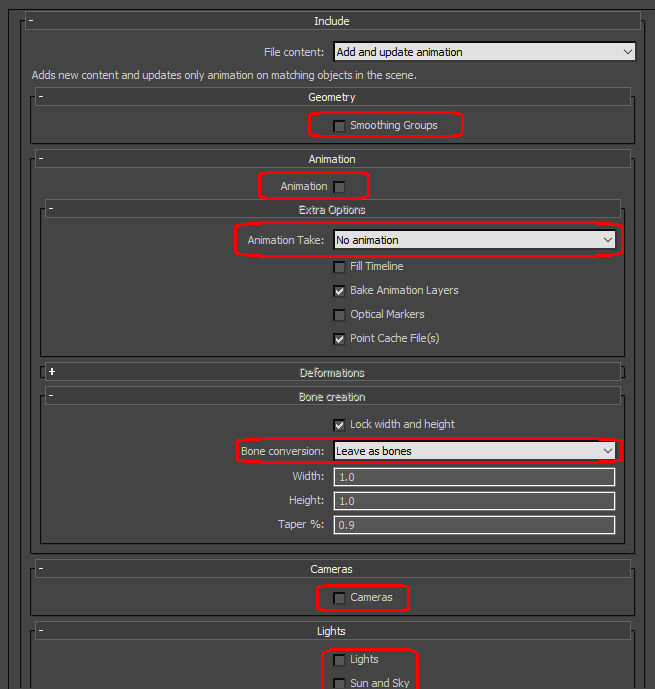
The import dialog for .fbx files. Some of the required options are highlighted in red.
Use the following settings:
| Include
|
|
|
Geometry
|
|
|
|
Smoothing Groups
|
Uncheck
|
Source
Word document is here.

