This wiki is archived from 2021-09-05
Example Mod Custom Skybox
Example Mod: Custom Skybox
This example will demonstrate how to make a client mod that will shadow files. Shadowing means that files in this mod will take the place of the original files that come with PA without actually altering the original files. It also shows the use of the papatran tool to generate textures readable by Planetary Annihilation.
Custom Skybox
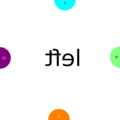
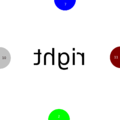
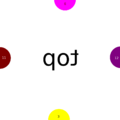
Here, we will change the background of a Planetary Annihilation system, also called the skybox. The planet system background is rendered on the inside of a large cube. The six sides are papa textures that can be found in /pa/terrain/sky/textures and are named:
- skybox_01_back.papa
- skybox_01_bottom.papa
- skybox_01_front.papa
- skybox_01_left.papa
- skybox_01_right.papa
- skybox_01_top.papa
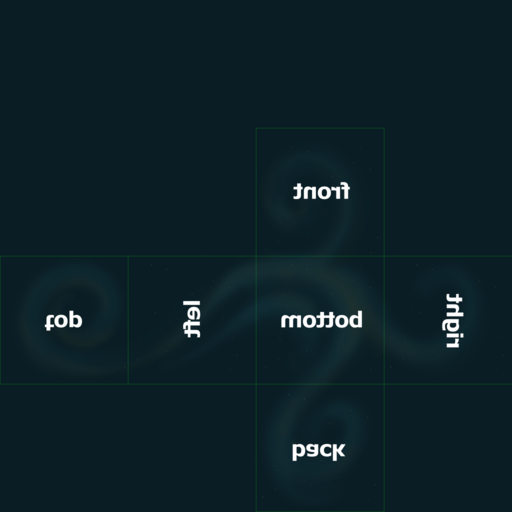
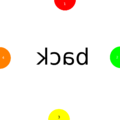
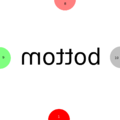
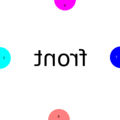
These images need to fit in a special way such that they all connect to each other at the edges of the cube as depicted here:
Alternatively download this set of files and use those as the basis of the custom skybox:
Mod structure
To create a new local client mod, navigate to the Planetary Annihilation Data Directory and if it does not already exist, create a new directory called "client_mods". Inside that directory create a directory for our new mod, for example: "com.pa.you.your-skybox-name". And inside of that directory, create a new text file called "modinfo.json". This will contain the information about our mod. It should look like this:
 {
   "context": "client",
   "identifier": "com.pa.you.your-skybox-name",
   "display_name": "My Custom Skybox",
   "description": "This is a demonstration of a custom skybox",
   "author": "you",
   "version": "1.0",
   "build": "105067",
   "date": "2017-11-13",
   "signature": "not yet implemented",
   "forum": "",
   "priority": 100,
   "icon": "",
   "category": ["skybox"]
 }
See here for more details on the meaning of these entries.
Next, we are going to add the files we are going to shadow. To do so, we need to create the exact same file structure that PA uses. Since the skybox textures in Planetary Annihilation are located in pa/terrain/sky/textures, we have to create a new directory called "pa", then inside that directory a new directory called "terrain", and inside that "sky", and then finally inside that "textures".
Now we should have the following structure:
- Planetary Annihilation Data Directory
- client_mods
- com.pa.you.your-skybox-name
- modinfo.json
- pa
- terrain
- sky
- textures
- sky
- terrain
- com.pa.you.your-skybox-name
- client_mods
Generating textures
Textures for the skybox are generated from PNG images that have a resolution of 1024x1024. We need six of them for all of the sides as shown above in the reference image. You can create them yourself or, for example, use Space Engine to generate them. For Space Engine you can follow the steps in the tutorial by superouman.
Name these six images as
- skybox_01_back.png
- skybox_01_bottom.png
- skybox_01_front.png
- skybox_01_left.png
- skybox_01_right.png
- skybox_01_top.png
And place them in the "textures" folder you created above.
Next, we also need some files that tell papatran what format to use for the skyboxes. These files are called "default.settings". Copy the one from Planetary Annihilation Installation Directory/media/pa/ to Planetary Annihilation Data Directory/client_mods/com.pa.you.your-skybox-name/pa/ and then copy the one from Planetary Annihilation Installation Directory/media/pa/terrain/sky/textures/ to Planetary Annihilation Data Directory/client_mods/com.pa.you.your-skybox-name/pa/terrain/sky/textures/
Now we should have the following structure:
- Planetary Annihilation Data Directory
- client_mods
- com.pa.you.your-skybox-name
- modinfo.json
- pa
- default.settings
- terrain
- sky
- textures
- default.settings
- skybox_01_back.png
- skybox_01_bottom.png
- skybox_01_front.png
- skybox_01_left.png
- skybox_01_right.png
- skybox_01_top.png
- textures
- sky
- com.pa.you.your-skybox-name
- client_mods
Now we can use papatran to convert the png image to papa files. Since papatran is a command-line utility we need to open a terminal (on Linux and macOS) or a command shell (on Windows). On Windows, the command shell is kind of hidden, click on start and type "cmd".
Then navigate to Planetary Annihilation Data Directory/client_mods/com.pa.you.your-skybox-name using the "cd" command. Then you need to run the papatran program as follows:
 "pathtopa/papatran" -o pa/terrain/sky/textures/skybox_01_back.papa pa/terrain/sky/textures/skybox_01_back.png
 "pathtopa/papatran" -o pa/terrain/sky/textures/skybox_01_bottom.papa pa/terrain/sky/textures/skybox_01_bottom.png
 "pathtopa/papatran" -o pa/terrain/sky/textures/skybox_01_front.papa pa/terrain/sky/textures/skybox_01_front.png
 "pathtopa/papatran" -o pa/terrain/sky/textures/skybox_01_left.papa pa/terrain/sky/textures/skybox_01_left.png
 "pathtopa/papatran" -o pa/terrain/sky/textures/skybox_01_right.papa pa/terrain/sky/textures/skybox_01_right.png
 "pathtopa/papatran" -o pa/terrain/sky/textures/skybox_01_top.papa pa/terrain/sky/textures/skybox_01_top.png
, where "pathtopa" has to be replaced by the Planetary Annihilation Installation Directory. Also note that for Windows you need to use \ instead of / and that papatran is located in the bin_x86 subdirectory.
If everything went smoothly, there should now be papa files in the textures directory and we should have a functioning custom skybox mod now.
To test the mod, start Planetary Annihilation, go to "Community Mods", and go to the "Installed" tab. You should see your mod there. Click on it and then click on the "Enable button". You may need to restart PA now. Then start a new game and you should see your custom skybox.
Clean-up
When publishing the mod, you don't need the png files or the default.settings files. So either remove them or don't include them in the ZIP file when packaging the mod. See Submitting Your Released Mod for details on how to publish your mod.
